2022. 11. 18. 18:27 WorkHolic
UPS 사용시 정전 이후 복전 시 서버 켜기
728x90
반응형
UPS 사용시 정전 이후 복전 시 서버 켜기
| 상황 1 정전
프로그램 작동
서버 종료/꺼짐
UPS 종료/꺼짐
복전
UPS 켜짐
서버 BIOS 설정(after power loss : on)에 따라 서버 켜짐
|
| 상황 2 정전
프로그램 작동
서버 종료/꺼짐
복전 (UPS 작동 중)
서버는 수동으로 켜야 함
|
| UPS fails to automatically power on if AC Power is restored before PowerChute Network Shutdown has issued a UPS/Outlet Group turn off command.
=> it needs to be manually powered back on.
2. 배터리 방전 되기전에 서버 종료기능을 넣었는데 다시 전원이 들어 올 경우에 서버 자동 부팅가능한지는 확인해보셔야 될 것 같습니다.
일반적인 기능으로는 안 되는 것으로 알고 있습니다.
|
“상황 2”를 해결하기 위해 공유기 등 제 3의 장치를 이용하여 WOL 기능으로 서버를 부팅시킬 수 있음
예) 장치에서 5분 마다 1번씩 WOL 패킷 발송
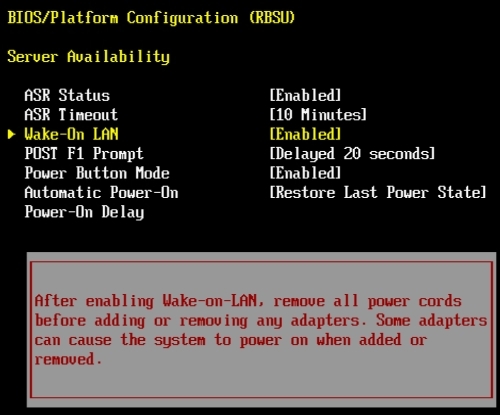
HPE ProLiant Gen9 Servers - How to Set Wake On LAN option?
Enabling or disabling Wake-On LAN
1. From the System Utilities screen, select System Configuration > BIOS/Platform Configuration (RBSU) > Server Availability > Wake-On LAN and press Enter.
#UPS #정전 #복전 #서버자동시작
728x90
SMALL
'WorkHolic' 카테고리의 다른 글
| PHP SQL Injection 방지 처리 코드 (4) | 2022.11.30 |
|---|---|
| SSD 돌연사 #2 (0) | 2022.11.18 |
| Linux 실행 파일 경로 문제 해결 (No such file or directory) (0) | 2022.11.15 |
| [Apache] (98)Address already in use: make_sock: could not bind to address 0.0.0.0:80 (2) | 2022.09.23 |
| 아파치 프록시로 다른 서버의 사이트 서비스 하기 (0) | 2022.09.23 |


